Introduction: The Blueprint for a Dream Bed Frame
How to put a bed frame together – In 2024 crafting a bed frame from scratch can seem like a daunting task, but with a well-planned approach and the right tools at hand, it becomes a fulfilling endeavor that adds a unique touch to your living space. This step-by-step guide will walk you through the entire process, ensuring your bed frame assembly is not only seamless but also a testament to your DIY prowess.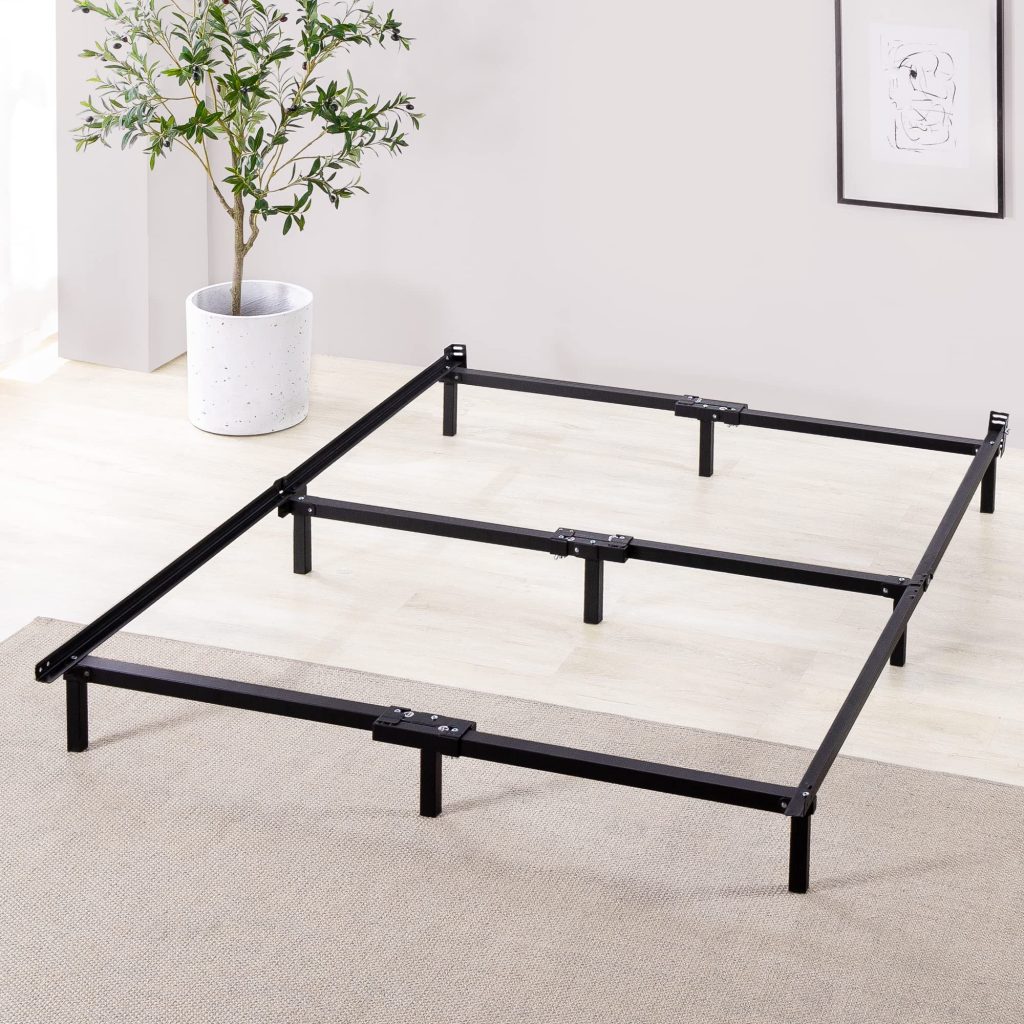
Gathering Materials and Tools: The Foundation of Success
Before diving into construction, gather all necessary materials and tools. Essential supplies include wooden planks or pre-cut pallet pieces, wood screws, brackets, a power drill, saw, measuring tape, spirit level, sandpaper, wood glue, and safety gear such as goggles and gloves. Ensure your planks are of consistent quality, free from rot or cracks, and ideally sourced sustainably. A well-equipped toolbox will streamline your work and guarantee precision throughout the build.
Designing Your Frame: Sketching Your Vision
Start by sketching out your bed frame design on paper or using digital tools. Measure the dimensions of your mattress to determine the required size of the frame. Decide whether you want a simple platform-style bed, one with a headboard, or even storage incorporated. Considering factors like room aesthetics, available space, and personal preferences will help refine your design. Remember, a clear plan is the first step towards a successful build.
Preparing the Wood: Smoothing the Path
With your design finalized, move on to preparing the wood. Sand each plank thoroughly to remove any rough edges or splinters, ensuring a smooth finish that’s safe and comfortable. Inspect each piece for defects and trim them to size using a saw, following the measurements from your design blueprint. Applying a wood conditioner before staining or painting can enhance the absorption and uniformity of the finish.
Constructing the Base: Laying the Groundwork
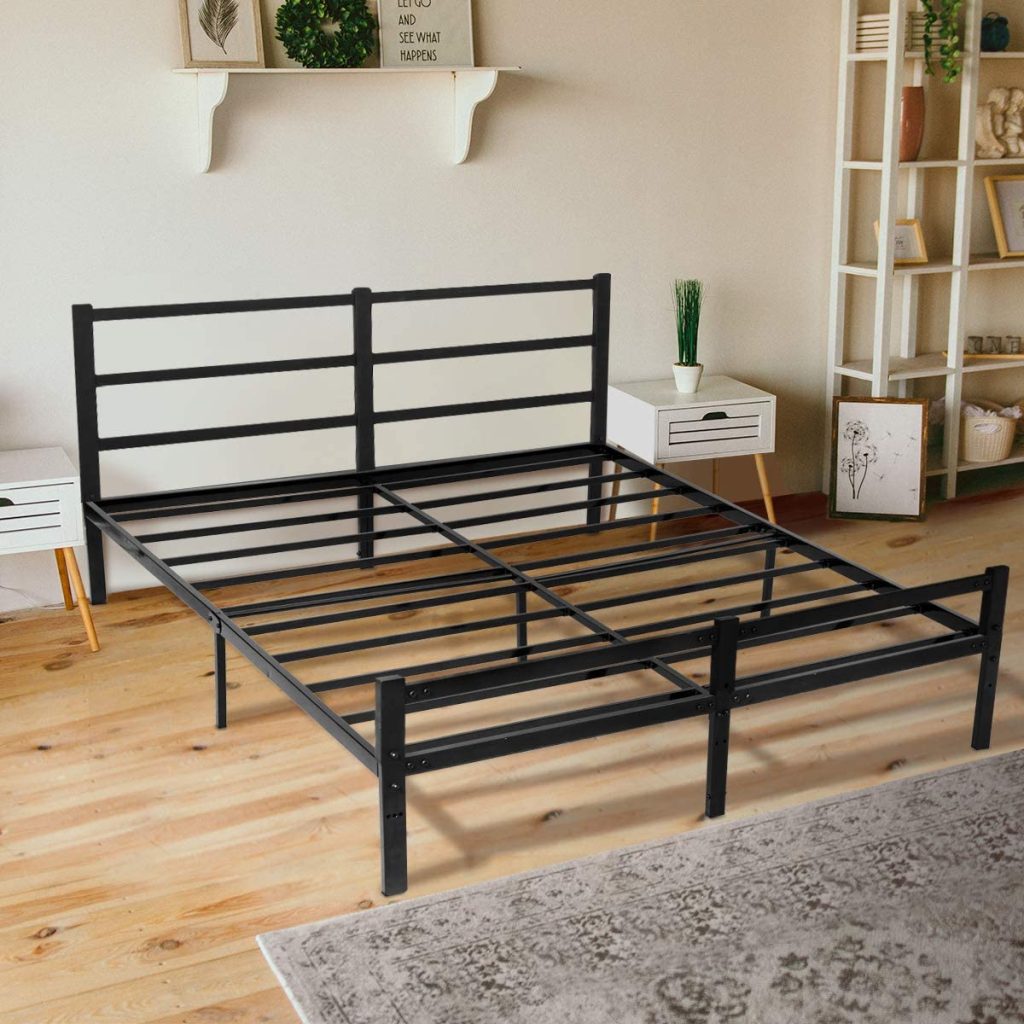
Begin assembling the base of the bed by laying out the side rails parallel to each other, ensuring they are perfectly level and equidistant apart to accommodate the width of your mattress. Attach the support slats across these rails using screws and brackets, spacing them according to the mattress manufacturer’s recommendations, typically around 3-4 inches apart for proper support. For additional stability, add center support legs or beams, especially for larger beds.
Attaching the Headboard: Adding Character
If your design includes a headboard, this is the stage to attach it. Whether it’s a straightforward plank arrangement or an intricately designed piece, ensure it’s securely fastened to the bed frame, either by screwing it directly to the side rails or using brackets for added stability. Double-check its alignment with the rest of the frame, using a spirit level to guarantee a straight, professional-looking installation.
Finishing Touches: Elevating Aesthetics
To transform your bed frame from functional to fabulous, focus on the finishing touches. Apply a coat of paint, stain, or a natural oil finish that complements your room’s decor. For a personalized touch, consider distressing the wood for a rustic appeal or adding a stencil design to the headboard. Installing LED strip lighting underneath the frame creates a warm ambiance, while adding casters can make moving the bed a breeze.
Safety Measures: putting a bed together
Safety is paramount when constructing furniture. After assembly, inspect your bed frame for any loose screws, sharp edges, or instability. Tighten all connections and consider rounding off any sharp corners or edges, especially if there are children or pets in the house. Regularly check the frame’s stability over time and make adjustments as needed. Applying a protective coating every few years can prevent moisture damage and prolong the life of your bed.
Assembly Tips and Tricks: how to put a bed together
For a smoother assembly process, work in a clean, clutter-free space and follow a systematic approach. Use pilot holes before screwing to prevent splitting the wood and maintain accuracy. Keep a trash bin nearby for immediate disposal of wood scraps and packaging. Moreover, enlisting a helper can significantly speed up the process, particularly when handling larger components.
Expanding Your DIY Horizons: putting together bed frame
Having successfully completed your bed frame, you might find yourself bitten by the DIY bug, eager to tackle more projects around your home. Here are a few ideas to continue exploring your creative and practical skills:
Nightstands and Dressers:
Complement your custom bed frame with matching nightstands and a dresser. Not only will they provide cohesive style to your bedroom, but designing them yourself ensures they fit perfectly in terms of size and functionality.
Bookshelves and Storage Units:
Maximize your living space with custom-built bookshelves or storage units. These can be tailored to fit odd corners or specific storage needs, turning unused spaces into functional and beautiful areas.
Dining Table and Chairs:
Extend your craftsmanship to the dining room by building a sturdy and stylish dining table accompanied by matching chairs. This can be an ambitious project but offers a great sense of accomplishment and a focal point for family gatherings.
Outdoor Furniture:
Take your DIY skills outdoors and build a patio set, including a table, benches, or even a pergola. Using weather-resistant materials, you can create a relaxing outdoor oasis tailored to your backyard’s dimensions and aesthetic.
Children’s Playhouse or Treehouse:
For a fun challenge that sparks imagination, consider building a playhouse or treehouse for the little ones. This project combines creativity, engineering, and a touch of nostalgia, creating a special space for childhood adventures.
Kitchen Island or Butcher Block:
Enhance your kitchen’s functionality with a custom island or butcher block countertop. Tailor it to include storage, a prep sink, or even a built-in wine rack to suit your culinary needs and style preferences.
Home Office Upgrade:
With remote work becoming more prevalent, create a productive and personalized workspace by building a desk, shelves, or a standing desk converter. Customizing your office furniture can optimize your workflow and reflect your personality.
Gather Your Tools and Parts: how to put a bed frame together
Before you begin assembling your bed frame, ensure you have all the necessary tools and parts. Typically, you’ll need:
- Allen wrench or screwdriver (depending on the screws used)
- Parts of the bed frame (headboard, footboard, side rails, slats, etc.)
- Screws, bolts, and washers (these are usually included with the bed frame)
- Instruction manual (if available)
Clear the Assembly Area
Choose a spacious area where you can lay out all the parts and have enough room to maneuver. Clear any obstacles to avoid tripping or damaging the bed frame components.
Read the Instructions
Even if you’re confident in your assembly skills, it’s essential to read through the assembly instructions provided by the manufacturer. Instructions can vary based on the bed frame model, so familiarizing yourself with the specific steps will prevent errors.
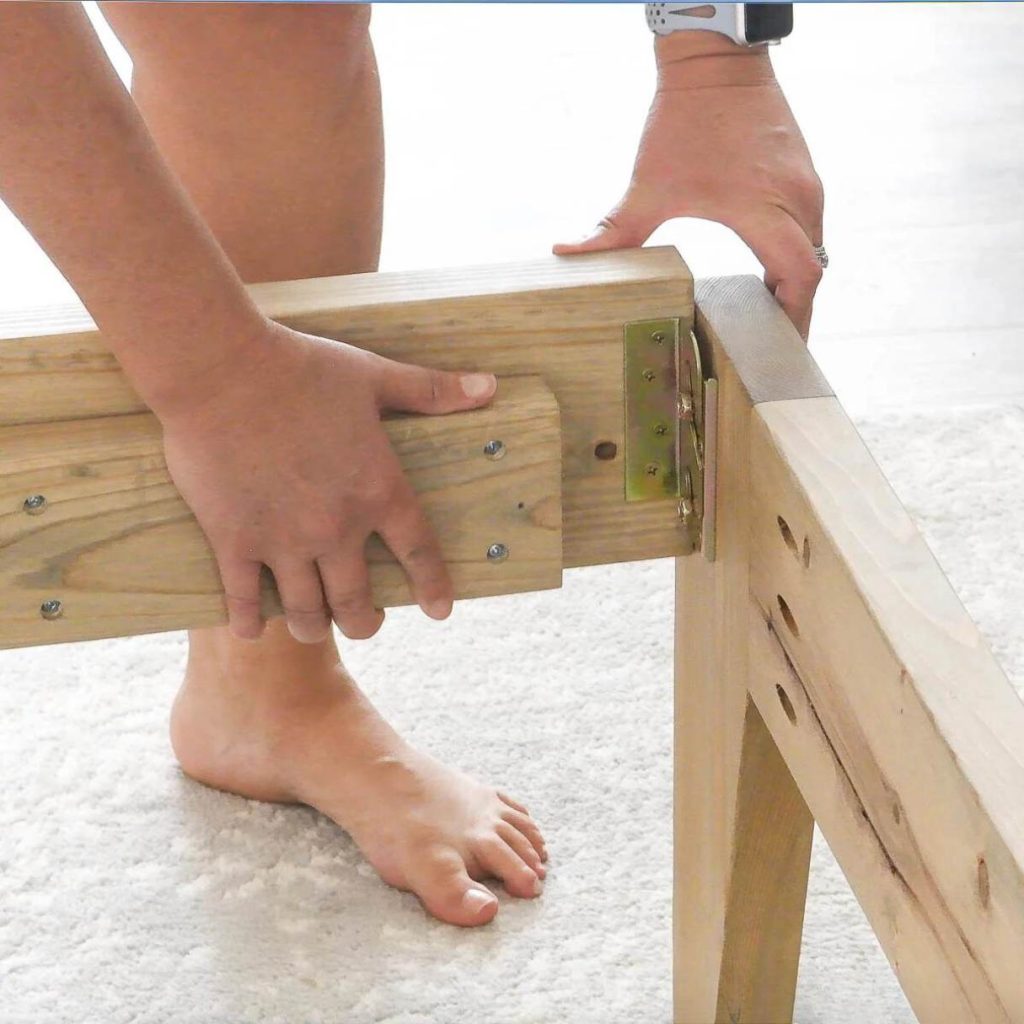
Start with the Headboard and Footboard: putting a bed frame together
- Identify Parts: Lay out the headboard (the taller end) and the footboard (the shorter end) of the bed frame. Place them upright with their respective sides facing upwards.
- Attach Side Rails: Typically, the next step involves attaching the side rails that connect the headboard to the footboard. Insert the bolts or screws into the designated holes on both the headboard and footboard.
- Secure with Bolts or Screws: Using your Allen wrench or screwdriver, tighten the bolts or screws to secure the side rails firmly in place. Ensure they are snug but not overly tightened to avoid damaging the wood or metal.
Install the Center Support (if applicable)
If your bed frame includes a center support beam or leg, this is usually installed next. Follow the manufacturer’s instructions to attach and secure the center support to the side rails or directly to the floor if required.
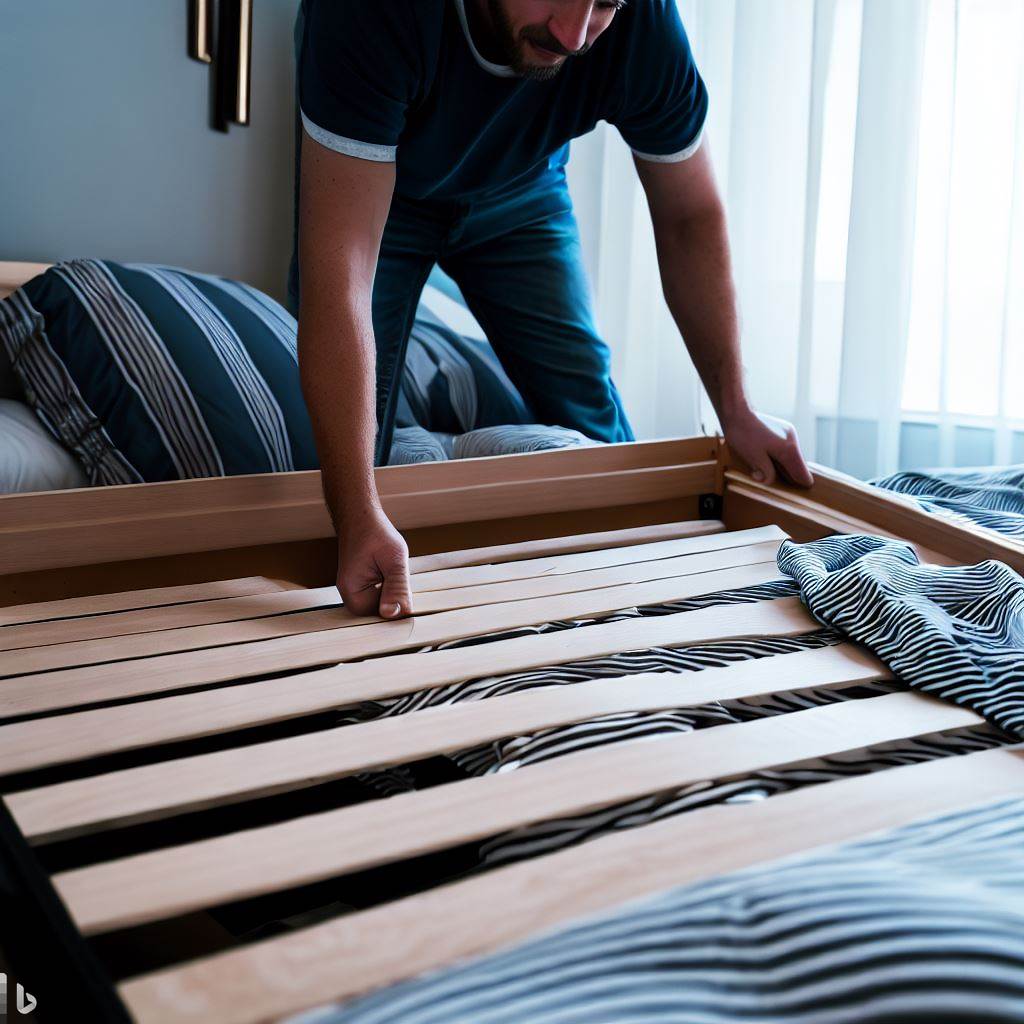
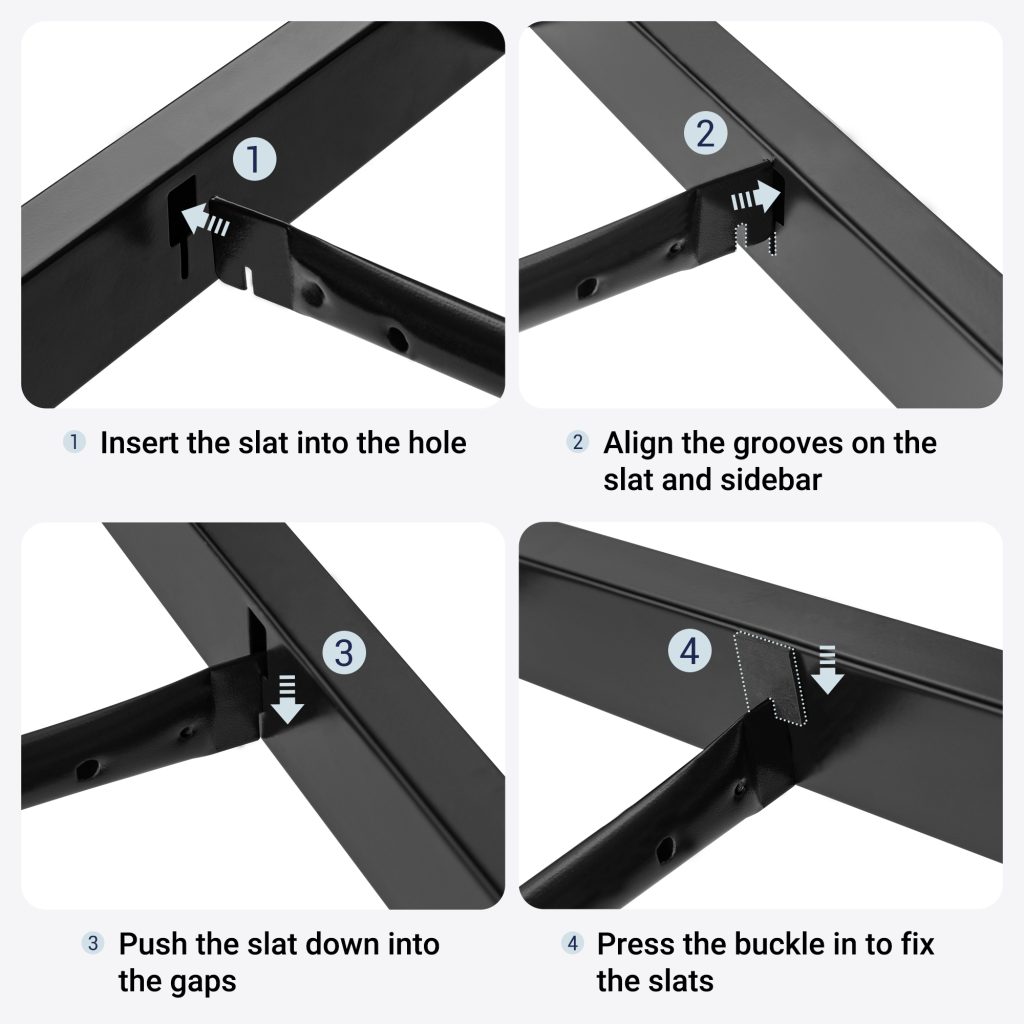
Add the Slats or Foundation
- Place Slats: Depending on your bed frame type, you may have slats that support the mattress directly. Position these slats evenly across the width of the bed frame. Ensure they fit securely into their designated slots or brackets.
- Adjust and Secure: Some slats may require adjustment to align correctly with the bed frame. Use screws or bolts (if provided) to secure the slats in place, ensuring they do not shift or move when weight is applied.
Check Stability and Alignment
Once all components are assembled, check the bed frame for stability and alignment. Shake or gently rock the frame to ensure it does not wobble or sway excessively. Adjust any bolts or screws as needed to improve stability.
Attach the Headboard and Footboard (if not pre-attached)
If the headboard and footboard were not pre-attached to the side rails, this is the time to secure them using the bolts or screws provided. Follow the manufacturer’s instructions to ensure proper alignment and stability.
Test Fit the Mattress
Before placing your mattress on the bed frame, test fit it to ensure it sits securely and evenly on the slats or foundation. Make any final adjustments to the slats or support beams if necessary.
Final Check and Cleanup
- Inspect: Once assembled, inspect the bed frame thoroughly for any loose screws, bolts, or parts. Tighten any components that may have loosened during assembly.
- Cleanup: Dispose of any packaging materials and tools properly. Clean the assembly area to remove debris or dust.
Additional Tips:
- Follow Weight Limits: Adhere to the weight limits specified by the manufacturer to prevent damage to the bed frame and ensure safety.
- Ask for Assistance: If the bed frame is heavy or complex, ask for assistance from a friend or family member to help with lifting and assembly.
- Save Documentation: Keep the instruction manual and any spare parts in case you need them for future adjustments or repairs.
By following these detailed steps, you can assemble your bed frame efficiently and enjoy a sturdy foundation for a good night’s sleep. If you encounter any difficulties or uncertainties during assembly, refer back to the instruction manual or contact the manufacturer for assistance.
Final Thoughts: Celebrating Your Handiwork
Completing your bed frame assembly marks not only the end of a project but the beginning of a new chapter in your living space. Take pride in knowing that you’ve crafted a functional and aesthetically pleasing piece of furniture with your own hands. Your custom bed frame will serve as a reminder of your creativity and dedication, providing a comfortable haven for restful nights and a conversation starter for admiring guests. Enjoy the fruits of your labor and let it inspire future DIY endeavors.